Monday, 14 July 2008

How to build a cyanometer


A cyanometer, step by step

My previous post, Blue sky research with a cyanometer , I introduced you to the cyanometer and its use for artists. I will now explain how I built mine.

  • I cut a rectangle of cardboard (15 cm x 10 cm)

  • I traced on the cardboard three rows of squares (1.5 cm x 1.5 cm). Each row was separated by 1 cm.


  • I cut out the windows in the cardboard

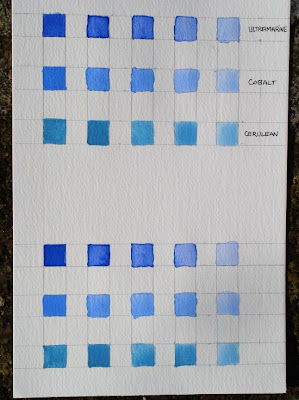
  • I painted on a sheet of watercolour paper two identical sets of blue squares using watercolour paint that I diluted more and more with water in order to get graded blue shades. I used some Ultramarine blue, Cobalt blue and Cerulean blue.


  • I cut one of the sets and numbered the colours from 1 to 15 (the reason I painted 15 squares rather than 12 is that I anticipated that some shades would be too close to each other to make a real difference. I gave myself the possibility to eliminate 3 of these too similar shades)


  • I then ordered the shades from darker to lighter and reported the order onto the reference chart.

Afterthoughts
  • The dimensions of the cyanometer and of each coloured square do not really matters. The idea is that you want your cyanometer to be small enough to be able to pack it in your painting box or bag when you go on your field trips.
  • On reflexion, it would be better to have many more shades of blue to have closer matches with the colour of the sky. Around 40 shades would give a better spread and there a higher chance to find the perfect match. I found that Turquoise blue was missing and Blue Rex could prove useful. Additional shades of blue could also be obtained by mixing together some of the blue I used on their own. For instance, you could mix “Ultramarine + Cerulean” and then lighten the new colour with white to generate a new series.

  • It is probably easier to grade colours with oil or acrylic paint rather than with watercolour because you can use some white paint to get a nice and regular gradation. I found more difficult to control how much water I had to add to my colour from one square to the next.
Building a cyanometer is child play… and would also make a great week-end project for children. What better way to make them observe the sky and discover that there is nothing like a one-blue-only-sky?

Related articles
Blue sky research with a cyanometer ,


Add to Technorati Favorites

Friday, 11 July 2008

Blue sky research with a cyanometer

Science and art have a long history of crossovers: botanical illustrations, anatomy drawings… Observation is key to both scientists and artists. Accurate depiction of the observed reality moves science forward. Artists can better paint or draw what they understand. It is easy to forego what is in front of you if you don’t “know” it is there.

Artists can develop this ability to “see”. They also have a creative mind. The combination of the two leads to breakthrough intuitions. Some artists painted what they observed so well that scientists relied on their paintings to describe certain physiological conditions.

The cyanometer

The cyanometer is a device invented by the Swiss scientist Horace Bénédict de Saussure to measure the blueness of the sky. The picture will give you a better idea than a long description.


De Saussure’s name is linked to the birth of mountaineering. In 1760, he offered a reward for whoever would climb on the top of the Mont-Blanc. This feat was accomplished in 1786 by two climbers: Jacques Balmat and Gabriel Pascard. A year later, on August 3rd 1787, de Saussure himself went on top of the mountain with his butler and eighteen guides. He needed that many people to carry all the devices he wanted for his scientific experiments. One of the devices was a cyanometer.

De Saussure hoped that the information collected on the blueness of the sky could be used for weather forecasts. The cyanometer proved of little use for this task. It could however be useful to the painter.


The artist and the cyanometer

A cyanometer provides an easy way to study the sky and find out about the different hues of blue that compose it. The windows in the divice play the role of isolators. You can observe the exact hue because the blue you observe is mostly framed with a neutral colour, removing the interference of simultaneous contrasts.

There are many paths to explore:
  • Where is the sky of a lighter blue?

  • Is the sky lighter or darker towards the horizon?

  • How many kind of blue can you find in the sky?

  • How the morning sky compares to the afternoon one?
If you use the cyanometer in conjunction with a reference chart (where you noted how you mixed the different shades of blue), the cyanometer will help you to determine how to mix your blue colours to paint the sky.

You could even use the cyanometer in the same way to judge the different shades of blue on your reference photographs.

I will soon explain the way to build a simple cyanometer.


Add to Technorati Favorites


Wednesday, 9 July 2008

Art and medical conditions


The Times recently (July 5, 2008) published an interesting article by John Naish titled “The painter who sees through the eyes of the blind”. Adam Hahn, a visual artist, painted portraits of people affected by age-related macular degeneration (AMD) the way they would see themselves. The portraits are blurred in places, depending on the level of degeneration of the eye.


The article contains reference to famous past artists and how their medical conditions could have affected their painting.


  • Degas had retinal eye disease.

  • Monet suffered from cataracts for ten years before he had surgery to recover a clear view.

Michael Marmor, an ophthalmologist from Stanford University, argued that both Degas and Monet became more abstract in their work because of their eye problems.

The same goes for Turner:
“Likewise, Michael Lamensdorf, an ophthalmologist in Sarasota, Florida, believes that Turner's fuzzy landscapes were the result of bad eyesight. He compared the fine detailing and clear blues in the 19th-century painter's earlier work with his later work, which is limited to reds. “In my opinion, Turner developed a dense, red-brown cataract that blocked out all the blue and green colours,” he argues.”
Another comment in the article gives an excellent insight into the reaction of art critics when confronted with these theories:

“Such medical views are, however, greeted sceptically by many art historians and critics, who prefer to believe that the artists' development was driven by intellect, instinct and inspiration, rather than ocular degeneration.”

I am not surprised by the reaction of some art historians but I think they miss the point. Does the fact that Monet’s medical condition is likely to have influenced his art in a significant way make him and ordinary painter? Does this mean he was not a genius? I would say his genius transpires from how he transcended and used his medical condition to serve his art. Far from accepting the limits imposee on him by illness (although he complained about his condition), he used his deteriorating eyes the best he could to express his different vision of the world.

Artists don’t give-up in the face of adversity, they look for ways to use in their artisitic venture what life throws at them.


Monday, 7 July 2008

Two tea cups - Oil painting


The weather was changing this week-end, between sunshine and rain, and it was too risky to go outside to paint. I wanted to get a break from two oil paintings (one still life and one cityscape) I am working on at the moment.


I set-up two tea cups on a tea towel on our dining table and painted them. I liked the light on the china and how the cups blend in some part into the background.


Two tea cups - Oil on linen canvas pannel (6" x 8") by Benoit Philippe

Thursday, 3 July 2008

Working out tones with linocuts

Linocut is a great way to develop your sense of tones and to force you to simplify your designs.


How making linocut can help you as a painter?


  • You must see clearly dark and light tones: linocut is essentially binary. Light tones are obtained by removing material with the chisels; everything else is dark.


  • You have to simplify: as already stated, you are working in black and white. Therefore, you must decide whether a mid-tone a closer to the dark side or the light side and draw the line accordingly. You could get some mid-tones by hatching the surface, but this process is more limited than when doing etching.


  • You have to think in term of negative shapes: The material you remove is your white, which is the reverse of what happens when you draw. You cannot carve well without seing the negative shapes.

Linocut is a cheap printmaking process. The material you need is minimal:


  • A piece of linoleum


    Front and back of a linoleum board


  • Cutter to cut pieces of linoleum to the right size


  • Some chisels or gouges (some “u” shape and “v” shape). Kits contain the handle and a set of different blades.


    Wooden and plastic handles


Different types of blades


  • Tracing paper to transfer your initial drawing


  • Some ink or paint (you can buy special inking paint for linoleum, but I have used gouache and acrylic with good results)


  • A brayer to ink your carved linoleum.


This technique is easier than woodcutting because there is no grain and you can carve in any direction.

If you follow these simple rules, you will have completed your first linocut in (almost) no time:


  • Never, I repeat: NEVER put your fingers in front of the chisel blade. When you press on the piece of linoleum with the hand that is not holding the chisel in order to prevent it from moving, make sure your finger are behind the blade at all time.


  • Start with a small “v” shape chisel to delineate the drawing and only use the bigger chisel later.


  • Do not rush. If you are too fast, the chisel will slip on the surface and scratch it where you don’t want to remove material.


Tea Time - Linocut by Benoit Philippe


Related articles and resources