 |
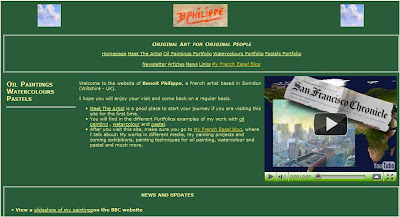
| Old design for my painting website |
Considering that I wrote my first website only with a basic text editor and wrote it in html and CSS, after buying a couple of books on the subject… it was not that bad. The drawback of this method was the time it took to create it and then to update it. Working this way is very repetitive and prone to mistakes. On the upside, learning to code html and CSS is valuable when I want to create something specific on my website.
The redesign was long overdue. I almost did it in April 2009 and then it fell through the cracks. I picked it up recently and did not let the project go this time.
 |
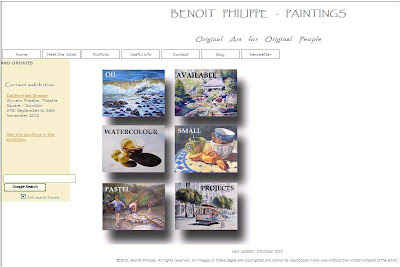
| New design for my painting website |
The new design
My brief was: create an uncluttered space that let my paintings speak for themselves.
I started with a blank piece of paper. It is tempting to buy a website editing software and just use one of the templates, but your website will look like hundreds of other websites out there. So, I followed the advice of experienced designers: paper and pencils is the best way to start. I just drew the elements on a blank page and tried different combinations until I found one I liked. While doing this, I reviewed many artists’ website, noting what I liked and what I did not like about them.
What is different on the new website?
- The white background does not compete with the paintings. You can’t get more simple that this.
- Many of the elements (titles, text and menu buttons) are grey, a neutral colour that again does not distract from the art.
- The colour scheme is minimal. I worked with three colours: A sandy colour for the side bar, a light camel colour for the links and grey.
- For the titles, I wanted a font that looked good and was legible. After trying many, I settled for Papyrus.
- In the portfolios, the gallery consists only of the images, without the titles, medium or dimension of the works. This looks much cleaner and all these details are available for each painting when you click on the image to see a larger version.
What I added to the website and you should get
After reading many articles on creating an artist website, I added a number of elements on the website.
- A Google search box on the homepage. I found the script using… Google.
- My photograph in the “Meet the artist” section.
- My contact details in the “Contact” section. I also added links to my contents on Twitter, Slideshare and YouTube
The best way to get a project like this done is:
- Work with checklists. For each page you create, there are a number of operations that you will have to carry out (write the title, list key works, etc.). Unless you use checklists, you WILL forget one step. What also happen is that you will think about one thing you must do or want to add on one page in the middle of creating another page. The best way to deal with this: just add it to your list to get it off your mind.
- Batch operations. For instance, to create JPG file in web friendly format for each work in Photoshop Element, it is easier to do all the vertical paintings in one go and then all the horizontal paintings.
- Take small steps until you are done. If I had 15 minutes available on a particular day, I could still create a single page and get closer to my goal.
Testing phase
Check, double check and check again. After I loaded the new website, I navigated it, clicking on all the links. Result? Missing images, broken links and wrong page titles. It does not matter how careful you are, you will miss some steps. Testing is essential. I am sure there are still some glitches I need to take care of.
The tools I used
I used a photo editing software. I have Photoshop Elements 6. It is a great piece of software worth the investment and if you want to buy it, the last version is Adobe Photoshop Elements 8 (PC DVD)
If you are on a budget, GIMP is a good alternative (see below).
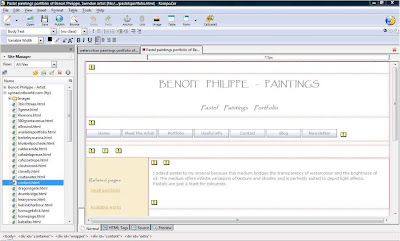
To edit the page, I used an open source software called KomPozer (More on this software below). It made the whole process much easier.
Free resources for the creation of your artist website
- GIMP is a free alternative to Photoshop for photo editing and manipulation. I have not used it but read very positive reviews. If you want to learn more about this software, check out “GIMP Help: Tips, Advice, and Tutorials on How to Use GIMP”, a series of articles on EmptyEasel.com.
- Kompozer (available Windows, Mac, Linux) is a free WYSIWYG (What You See Is What You Get) editor for web pages and site management software. The program was easy to install and use.
- Filezilla (Windows, Linux, and Mac) is open source File Transfer Protocol (FTP) client. Kompozer has the capability to load your website onto the server, but this is a good alternative if you want a dedicated FTP software.
 |
| The dashboard of KomPozer |
Recommended books
Although I also wrote about software tools in this article, the most important part is the design itself. The following books were a great resource for educating me on design principles:
- DIY: Design it Yourself (Design Handbooks)
by Ellen Lupton. Read a review of this book.
- Hot-Wiring Your Creative Process: Strategies for Print and New Media Designers
by Curt Cloninger. Read a review of this book.
- Presentation Zen Design: Simple Design Principles and Techniques to Enhance Your Presentations (Voices That Matter)
by Garr Reynolds. You should also check his website Presentation Zen that contains great posts.
Art marketing Art website Artist website Website design Creating an art website Art website design Open source Free website editor Kompozer Filezilla Ellen Lupton Garr Reynolds Presentation Zen

No comments:
Post a Comment