Thursday 31 December 2009

The Colorist Top 10 Posts 2009

What a wonderful way to finish 2009 and to get a boost for 2010! Casey Klahn, the pastel artist behind The Colorist awarded The French Easel a virtual medal for the post on Working on the same subject in different media.


It is an honour to be in such good company as the other artists represented in this selection. Make sure you check the full list of winners . I am also proud of this nomination as I like very much what Casey paints and his use of colours.

Happy New Year 2010 to all!

Benoit

Wednesday 16 December 2009

The benefit of small studies


It is tempting to put a large canvas up on your easel and start painting straight away. However, a small study made before a larger work acts as a roadmap and the investment made upfront pays tenfold. One of the main shortfalls of beginner painters is an inability to see in the burgeoning stage of a painting the potential of the finished work. Because of the insecurity this creates, there is a tendency to push too far the degree of finish in a single area of the painting before moving on a repeating the same, rather than developing the work as a whole.


"Night roadwork" - Oil on panel (6" x 8") - the initial study

A preliminary study works as a rehearsal for the finished work. It is a good way to resolve composition issues. Small studies done on site are also ideal to capture fleeting moments and bring these impressions you had during a field trip into the studio.

Digg this! - Oil on canvas by Benoit Philippe


When you plan to paint a large painting from a photograph, executing a smaller version of the subject is an excellent way to put distance between you and the photograph. When you paint the smaller version, you start to see and think as a painter and edit out all the unnecessary details that photographs can offer.

Monday 14 December 2009

We never know what we are going to do


“We never know what we are going to do. We start a painting and it becomes something totally different. It is curious how the will of the artist does not count much.”

Picasso (Daniel-Henry Kahnweiler “Entretiens avec Picasso au sujet des Femmes d’Alger”, in Aujourd’hui, no.4, September 1955)

Friday 11 December 2009

10 ways to improve your watercolours with a ruler


This article was first published in "Frequency Magazine"– December 2009.

A ruler is a familiar object, part of every child’s school kit and a rather unglamorous piece of office supply, but do not discount this mundane tool and you will get lots of mileage out of it.

To be able to perform all of the techniques described below, you should buy a clear acrylic ruler that is sturdy enough. Some models feature a grid or vertical lines that prove useful to check alignment and draw right angles. A 300 mm ruler divided into imperial and metric will be suitable in most situations while being transportable. Avoid metal rulers that risk marking the paper in some of the uses described below.


  • Measuring: This use is obvious, so I won’t spend too long on this. If you work from photographs, taking measurements of key features will make keeping accurate proportions between the different elements in the picture a breeze.

  • Materialising the horizon: By placing the ruler on your paper to materialise the horizon, you can visualize how the composition would look. In a landscape, this will help you to decide how much sky or land you want to show.

  • Tracing objects in perspective: I would rather draw everything free hand to get a more natural feel, but there is one case where I always welcome the help of a ruler: drawing buildings in perspective. Remember that all lines which are not in the plane of the paper will converge and vanish on a point located on the horizon (could be one or two points depending on the perspective). Verticals remain vertical and this is also something you can check with a ruler.


  • Use the ruler as a mahl stick: For oil painting, a mahl stick is used to rest the hand holding the brush in order to paint details without touching the surface of the wet canvas. It is composed of a long thin pole with a rounded pad at the end. You can use your ruler in the same way by having one end of the ruler resting on the drawing board just on the side of the stretched paper while your free hand holds the ruler in position across the paper, a few centimetres above its wet surface. You then rest your hand holding the brush on this improvised mahl stick to paint with accuracy.

  • Use the ruler as a hand rest: In this case, the paper is dry and the ruler can rest flat on the paper surface. One reason you may want to do this is to avoid the grease on your hand transferring onto the paper. This is more relevant in hot weather.

  • Use the ruler as a guide to apply masking fluid: Rest one edge of the ruler on the paper, hold the ruler at a 45 degrees angle and use the other edge to guide the ferrule of the tool you apply masking fluid with. This technique is useful to reserve light ripples on calm water.

  • Paint straight lines with a ruler: This technique is based on the same principle as the previous technique but with paint rather than masking fluid. In order to get the correct position, align the side of the ruler you are going to use as a guide with the line traced on the paper, lift the ruler into position and then proceed as described before. This technique works well to paint boat masts, lampposts and telegraph poles.

  • Use the ruler as a temporary mask: Lay the ruler flat on the paper and paint over the edge. When you are done, lift the ruler carefully and wipe it clean with a paper towel. Your colour plane will have one straight edge. It is likely that some paint (in particular if highly diluted) will go under the ruler and the result will not be as clean as with masking tape. This type of accidents makes it an interesting technique.

  • Use the ruler as a stamping device: Apply paint on part of the edge of the ruler and use it as a stamp to print a straight line onto the paper. Wipe the ruler clean between applications. This is an effective way to paint dark railings.

  • Use the ruler as a squeegee: In this technique, the ruler is used in the same way the operator uses a squeegee (or rubber blade) in screen printing. Apply some colour on the paper, and then hold the ruler with both hands at a 45 degrees angle to the paper and drag the paint down using the edge of the ruler. Wipe the ruler clean with tissue paper as soon as you are done. A reverse use of this technique is to start with a graded wash and then, before it dries, to push the pigments up with the ruler. This will create a lighter area where the pigments have been removed and a darker zone where the pigments have been pushed to.

One last word: Overusing a ruler when drawing your composition may lead to a stiff and rather mechanical look, but use it with moderation or in a creative way and your watercolours will benefit greatly from this simple tool.


Add to Technorati Favorites


Friday 4 December 2009

My exhibition kit

When I set-up an exhibition, I want to have everything I need at hand so that I don’t waste time or have to come back. The photographs below show what I take with me when I set-up or take down an exhibition.


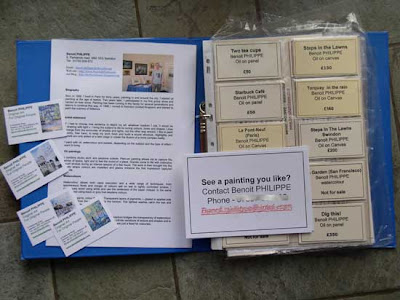
Binder with labels; signs with contact details on how to buy and business cards


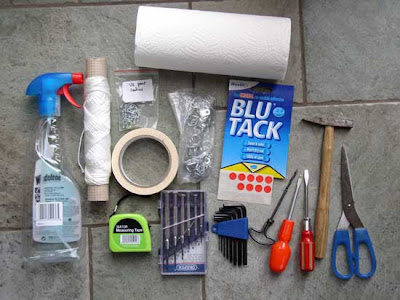
From top to bottom and left to right: paper towel, window cleaner spay, cord, screws, masking tape, framing rings, Blu Tack, measuring tape, 6 piece precision slotted screwdrivers set, Allen keys, hand drill, screw drivers, framer hammer and a pair of scissors

  • Repair kit for framed works: screws, screw drivers, hammer, string, rings and a pair of scissors.
  • Measuring Tape: To check appropriate spacing between paintings.
  • Window cleaner product and paper towels: A quick wipe to remove dust and finger prints from glass.
  • Blu Tack®: I use it to stick the labels below the paintings as well as my bio information and the signs with my contact details for people who want to purchase a painting. Another use of this product consists in sticking two balls of Blu Tack at the bottom of a frame in order to make it steady. If paintings are hung on a metal wire, it may be the only way to keep them from being ajar.
  • Precision screw drivers and Allen keys: Some hanging rods have small screws for the hook.
  • Masking tape: Now, I use masking tape to seal-off bubble wrap around my paintings. I found that it works better than packing tape as it comes off without damaging the bubble wrap (this way, I am able to reuse it over and over).

In addition to what is shown in the photographs, I also have the following items:

  • Digital camera: I always take a series of photographs of the exhibition when I finish setting it up. It serves a dual purpose: first for my record and future marketing use; then to complete my inventory and add the details of the exhibition to the comments section for each painting on display.
  • Pen and paper (or a small notebook): You never know when you need to take some notes.
  • Details for the venue: The email with the address of the exhibition venue, the name of the person in charge of the exhibition space and a telephone number to call in case of problems. If you are running late, you want to make sure you can call as a courtesy. The other time when a phone number is handy is when you don’t find the venue or the venue is closed the public and you cannot get in.
  • Some large IKEA carrying bags: You can buy them cheaply from their store. These blue bags do not look nice, but they are sturdy and ideal with their long handles to carry paintings. I also put in the bags all the pieces of bubble wrap in as I unpack the paintings in order to keep the space tidy when I set-up.

They best way to make sure you have a complete kit ready at all time is to keep everything you need in a separate bag of crate. This means you may have to buy duplicate tools and material.

If you cannot afford the cost or do not have the space to get duplicate of some of your tools, then you should put together a checklist with the content of your kit. There is always something to do at the last minute and, with the pressure to get ready, you don’t want to forget a vital piece of equipment. Having a checklist will bring you peace of mind (why do you think surgeons and pilots use checklists?)


Add to Technorati Favorites