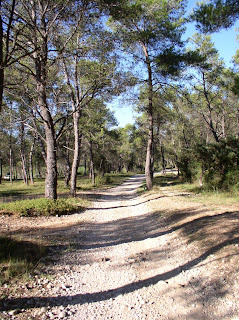
Photograph I took in a pine forest in Prades-Le-Lez, South of France
Paint from photographs: Build an images bank for your rainy days. For copyright reason, avoid using third parties’ photographs as model for your paintings (unless you have a written authorisation to do so from the author). Use your photographs as reference and don’t hesitate to combine several ones to compose your studio painting. Watercolour done using the photograph
- A safety net for your plein-air painting sessions. When I do a painting on location, I always shoot some photographs of the scene before I start painting. Having these photographs will ease your mind. You don’t need to worry in case the weather changes and the pouring rain forces you to pack. The photographs will help you to continue working and finish the painting in the studio.
- Capture moving subjects: People, animals, cars, and boats may move too fast to be accurately captured on the spot. Digital photography is an ideal tool to make what moves still.
- Field notes to record potential subjects. An image is worth a 1000 words. Sometime, you see a scene with a good potential but the sky is grey or the sun casts the shadow the wrong way. You think: the trees would look good with the colours of autumn… but it is July and you will forget unless you take some notes. In this case, you can take photographs and keep them as thumbnails. If you can find a map of the area on the Internet, you can even make a digital collage of your pictures on the map to pinpoint the locations to paint. The illustrated map will jog you memory, even after several months.
- Create a mood board: A mood board is used by designers to find the right mood for a particular work or project. Put all the elements you collect on a cork board or on the wall of your studio. You can cut out photographs in magazines, pin some postcards, use fabric samples or print your own photographs and add them to the mix. The emphasis here is not on the subject but more on the impression, textures, colours… in a nutshell: the mood.
- Record the different stages of your creative process: You can create an illustrated painting demonstration. Even if you don’t plan to share the photographs of the intermediate stages of your work with your customers, you will learn a lot by going back and analyzing how you created you art.
- Keep a record of all your works: Nothing should leave your studio without been properly photographed and documented. Make it a habit. As soon as a work is completed, take several photographs and check that you have at least one good photograph of each work.
- Illustrate your marketing material: Brochures, invitations, business cards, web sites, blogs come alive with pictures of your works.
- Experiment: Digital photography creates a risk-free environment. You can take as many photographs as the memory card of your camera will let you. Keep what you like and discard the rest. Shoot in the light, close-up or using weird angles. Go wild.
- Study composition: You cannot change the landscape in front of you, but you can move and choose what you are shooting and where you are shooting from. If you take photographs of a still life, you have total control over the setting and the composition. You can learn what works and what does not by composing your photographs and then you can apply the same principles to your paintings.
Let me know how you use digital photography to serve your art.
digital photography plein air painting painting technique mood board art marketing

2 comments:
No comments? I can't get through your 'screening' process; and I doubt if anyone else can either.
I got through after trying 15 times!
Post a Comment