Showing posts with label Art studio hack. Show all posts

Thursday, 28 August 2014

Limiting waste when painting with oil paint

With the cost of paint and art supply, I make sure to waste as less as possible.

Making the best use of your paint

When I paint in oil, I put all the colours on my palette before I start painting, because I don’t want to have to stop and break the rhythm when I am in the flow. I pour a blob of each colour (experience will tell you how much you need for a certain canvas size) and two or three times the amount of the colour paint for Titanium White.

Even if I am careful, I always end-up with some paint left on the palette. For example, my painting Coate Water Lake turned more on the cooler side of the palette. I used most of the blue colours, but was left with some of the following:
  • Cadmium Lemon
  • Cadmium Yellow Deep
  • Cadmium Red
  • Alizarin Crimson
Certain colours in oil paint are pricey and you would be surprised how much money you would waste by just wiping off the paint. There is so much you could do with the left-over paint.

A few things you can do to make the most of the paint left.

  • The first option is obvious. If you plan to carry on working on the painting the next day, the paint should still be good. Traditional oil paint takes a few days to harden. Same thing if you plan to start another painting the next day. In both cases, selectively clean your palette to wipe out thin layers of paint that would dry more quickly and areas where you mixed the colours.

  • Outlining your next painting and putting on some undertones. I did just that in the painting below. Warm tones (orange and red) work well as undertone for grass and foliage because they are complimentary colours to blue and green colours. Don’t be afraid to be bold.


Re-using oil thinner

The first way to save thinner is to pour only what you need. I am using a small metal dipper that I clip on the side of the palette. The lid allows me to close the dipper and bring the full dipper back home without any mess. Some models have two containers.


When coming back from an outdoor session, I would start cleaning the brushes by dipping them first in the used thinner and pressing them on a rag (for a step-by-step description of the cleaning process, see Cleaning your brushes for oil painting).

I then use the same thinner to clean (or partially clean) my palette. I just pour the thinner on the palette and wipe the paint with a rag or some tissue paper.

Related resources and articles

Wednesday, 10 July 2013

8 Great Articles about Shipping your Art

Shipping art is an area where I struggle, although I have managed to ship a few paintings (including some under glass). But if you want to expand and reach more collectors, you need to be able to ship your art.


Over the last few years, I kept as reference some good articles I found on the topic and want to share them with you. They range from general advice to specific packing methods for particular media (pastel,or coloured pencil).


  • Shipping Pastel Paintings, Part 1 and Part 2 on Pastel Pointers 


Wednesday, 7 March 2012

An original brush rest

I was looking for a brush rest. They have some in artists’ supply catalogues but the choice is limited to a boring white ceramic model. Not very exciting...


A brush rest prevents the wet brush from touching the table or rolling on it. This is exactly what a chopsticks holder does. And now, by looking at chopsticks holders, I had a vast choice of brush rests.

I bought the one in the photographs below at a street market in Hong Kong. 


Monday, 13 February 2012

How to open a stuck oil paint tube

If I have not used some oil colours for some time, chances are that one of the tubes will be hard to open: the cap is stuck.

What not to do: you grab the tube, try to twist the cap hard, again and again, and twist the body of the tube instead. You repeat this a few times and the tube bursts. I know it happens... I have done it.

There are better ways to get to your precious locked away paint.

1. The smarter way with your hands

Use a rag or a paper towel to get a better grip and hold the tube by its upper part, just below the cap. This handling reduces the risk of twisting the body of the tube.

If it does not work that way, you still have two other methods to try.


2. With a plier

Same method as before, but this time you grip the cap with a plier.


This method works well on larger tubes because of their bigger cap.

3. The hot bath method

My father tought me this method and it works every time.


  1. Put the kettle on and then pour the hot water in a jar (not any that you plan to use for food – paint contains harmful chemicals)
  2. Dip the blocked tube upside down in the hot water and let it soak for a few minutes.
  3. Remove the tube from the hot water and unscrew the cap. Use a rag to get a better grip. The cap should come off easily. If not, let the tube soak for longer.
  4. Clean the inside of the cap and the screw on the tube with a rag and a palette knife. This way it will close properly.
I am not sure if it works because it softens the dry paint or because the hot water has an effect on the metal. All I know is that it works.

Tuesday, 17 January 2012

From cards to labels

You received plenty of Christmas and New Year cards from friends and family. Comes the time to take them down. Stop: don't throw them away... they can have a second life as labels.


A few labels from this year production - Abstract and stylized designs work well


I just use two card punches I found in a craft shop. The first one (below) cut out the label.


I then use a second one to punch out the small whole for the thead.


These labels are large and good for presents. But you get the idea and possibilities are only limited by your imagination: smaller labels as price tags, large labels used as "thank you notes", etc.


Wednesday, 5 October 2011

8 ways to deal with pastel dust

Pastel is a great medium: fast, luminous, subtle. The drawback of working with almost pure pigment is dust. Whatever technique you use, whatever style is yours, soft pastels crumble and generate dust. Here is my personal way to deal with it:

1. I always put an old vinyl tablecloth on top of the table I am working on. At the end of the session, I use an old sponge to clean the dust (don't use the sponge for the washing-up... some pigments are harmful chemicals).

2. I affix my pastel paper to a drawing board with strips of framer's tape and I tape a rolled paper towel under the pastel paper to catch some of the falling dust (see photograph).


3. I start by working with harder pastels (like the square Conté sticks) that do not make as much dust as the softer sticks.

4. If I feel that I have too much dust floating on the surface of the paper, I bring my drawing board outside of the house, hold the board straight and tap gently on its back to make the dust fall.

5. I wash my hands regularly with soap during the painting session. I am conscious that some chemicals may pass through the skin pores and, as I do not like to paint with gloves, I make sure I clean my hands often. I take extra care to wash my hand if I want to eat something during a break.

6. I apply fixative early in the process. Fixative can change the colour of pigments and some artists stay away from fixing their work for this reason. I take a medium approach. I will spray fixative two or three times during the painting process, but not in the last stage. I think this is a good compromise because it settles some of the pigment onto the surface but let the colours of the last layer intact.

7. If a pastel stick is dirty because it gathered dust from other pastel sticks, the trick to clean it is to have a small plastic container with raw grains of rice. You pop the dirty stick into the container and gently shake it. The rice will clean the stick.

8. I frame my work with a gutter behind the mount to catch any dust that falls after the work has been framed. See my article on how to frame a pastel for more details.

Wednesday, 23 March 2011

How to describe your artwork - mnemonic

Alyson Stanfield reminded all artists the proper way to describe their art: “Don’t forget that artwork is always listed as height by width by depth in inches or centimeters.” In other words: “Always H x W x D”. Read the whole article Crediting your artwork for the fine details or refer to Alyson’s excellent book I'd Rather Be in the Studio! (Affiliate link).


The trouble is that I can never remember the correct order when I need it (typically if I write an article for the blog or post a new painting on the website). So, I created a very simple mnemonic to help me to remember: How We Describe art.


Tuesday, 1 March 2011

My best art productivity tool? a daylight lamp


Days are now getting longer, but how do you handle all these long winter evenings or paint when you only have the end of the day available? The answer is simple: get a daylight lamp. The risk, if you paint under normal electric bulbs or tubes, is that your colours won't look the same the next day under natural lighting conditions.

My lamp is a an easel model from the Daylight Company. It is big (not for travel), with a retro look, and does the job perfectly. If you want to save money, you can just buy the bulbs or tube and fit an existing lamp. There is a range of bulbs and tubes available.

It is worth investing in one of these lamps if you have not done so.

Wednesday, 26 January 2011

How Picasso showed his works in the studio

This article was first published in my newsletter "Notes From My French Easel" – November / December 2010. Follow the link to subscribe to the newsletter.


Picasso had an unusual way to show his paintings to visitors in his studio. It seems natural, when showing a work, to isolate it so that it can get all the attention of the public without any competition from its surroundings. Picasso’s method was more “organic”. Here is Brassaï’s description in his book “Conversations avec Picasso”:


“The ceremonial of this operation has not changed since probably the Bateau-Lavoir... It consists of making with his paintings a kind of pyramidal construction, assembling them - usually around an easel that has already one or more paintings on it - to superimpose small to large formats, in order to enhance their affinity or contrast.”

Brassaï explains that Picasso liked the chance element in getting two works next to each other. This method was for him a perfect way to show in one go works from the same period.


Thursday, 30 December 2010

6 ways your image manipulation software can help you judge your work

By the time we have finished a painting, we spent so much time looking at it that it becomes difficult to judge it.

You need to put some distance between you and your work. One way to do this consists in taking a photograph of the work. Picasso once told Brassaï: "It’s strange indeed, but it is through your photographs that I can judge my sculptures… Through them I can see my sculptures with a new eye..."

Image manipulation software like Photoshop Element Adobe Photoshop Elements 9 (PC/Mac) or GIMP (a free open source alternative) let you do much more.

1. Watch the photograph of your painting as a thumbnail. This is the equivalent to stepping back from your painting. The minute details disappear and you can check the overall composition.


2. Flip the image horizontally. This is like looking at your painting into a mirror. If the vertical elements have a slant, you will see it immediately.


3. Make a black and white copy of the photograph of your work. This way you can check values. If you took a reference photograph of your subject, you can also turn it into a black and white photograph in order to compare the value range on both photographs.


4. Convert your picture to pure black and white. Turn the black and white photograph of your painting into a notan by pushing the contrast. In Photoshop, use the “Threshold” filter in the Image/Adjustments menu. Mid-tones disappear and you are left with pure light (in white) and pure dark (in black). This way you can judge the balance between large planes of light and dark areas. This contrast dictates how well the painting will stand when looked at from a distance.


5. Frame your work. Adding a frame to your work changes the way it looks. It is easy to add a “virtual frame” to your painting. The first way to do this in Photoshop is just to create a rectangle slightly larger than your work and to put the cropped photograph of your work on top of it. Then try different colour (black, brown, gold, etc.) for the rectangle so that it complements or contrasts with the painting. You could also photograph one of the real frames in your stock, extract the frame from the picture and copy it onto a transparent background, so that you can put it on top of the photographs of your paintings.

  
6. Hang your work amongst masterpieces. A painting may look good on its own and look different when surrounded by other paintings in an exhibition. You can create a virtual gallery of paintings you like with an empty space left to hang your own painting. Wikimedia Commons will give you a choice of images of works by past masters to copy into your virtual gallery.


Related articles


Monday, 6 December 2010

Another try at art exhibitions labels

For my last exhibition, I tried a different way to print my exhibition labels. Instead of using a heavy card, I printed them on paper and then mounted the paper on foam board. The idea is to come closer to the type of labels you see in galleries and museums.


I proceeded this way:

  • Printed all labels using PowerPoint, each label being in a black frame (to make sure they are the same size)
  • Cut the labels leaving a seam
  • Glued the paper on a 2 mm foam board and
  • Cut each label on the foam board with a sharp craft knife, using the black frame as a guide.


The overall result looked good. The labels were light and sturdy and easy to affix to the wall with whitetack . The foam being quite fragile, I had to transport the labels in a plastic sandwich box.


There is still room for improvement:


  • I had to redo some of the labels because the paper was torn away while cutting the label. I found out that the different density of the material caused the issue. The trick was to have a first pass with the blade to cut the paper and then a second pass to cut through the foam.


  • Some labels had a thin black line on some of their sides. I will have to be more careful to cut “inside the line”. Getting rid of the frame would solve the problem, but it would also make more difficult to cut all labels to the same measurement. I should try to print the frames in a very light grey. This way, even if the line appears, it should be almost invisible from afar.


Related articles


Monday, 29 November 2010

Jazzing up your leaflets presentation

You need to present some leaflets on a table in a way that entice visitors to take one? You want to spread them in a aesthetic way? The video (with soundtrack) shows you a simple method to do that.


Monday, 3 May 2010

Working from photographs

This article was first published in "Frequency Magazine" – May 2010.


Degas used photographs, Henry Moore too. There is nothing wrong with referencing photograph as long as you know their limitations and don’t let them enslave you.
Two comments before we start: first, snap your own reference photographs so you don’t infringe any copyright. Secondly, invest some time in knowing your camera and read some books on how to take better photographs.


Limitations of photographs and how to overcome them

Cameras exaggerate both ends of the value range: the very dark and the very light. This is due to the fact that camera are less sensitive to tonal differences than the eye and have a limited range between the brightest value and the darkest value they can capture (also called “dynamic range”). As dark areas appear darker on a photograph, you need to make adjustments and use in your painting a lighter tone than what you see. Another consequence is that small details are often lost in the shadow areas.

There are some practical steps you can take to help yourself. In addition to the normal exposure, shoot an underexposed and an overexposed photograph of the same scene. If you have any software to manipulate digital photographs, you can vary brightness and contrast to get an optimal result. Finally, working from the reference photograph on the computer screen rather than from a print will let you see more details in the shadow areas (Losing shadow details is often aggravated when you print because printers have a limited range in black).

The second potential issue is that camera can misrepresent colours as different films and sensors have different colour bias. Although software can help, the best remedy is to use your reference photographs in conjunction with a sketch or a small study done on site. If you do a sketch on location, you can annotate it with colour indications and record your impressions of the mood of the place.

The third particularity of cameras compared to the eye is that cameras can only focus on a single plane. What is outside of this plane will be out of focus. What we see with our eye (unless your have glasses and don’t wear them) is in focus. When painting, you may want to create focus in a different way from what you see on the photograph.


Practical ways to go beyond photographs

Unless you plan to develop a photorealistic style, you want to put some distance between your reference photograph and the final work. A good way to go beyond the photograph is to draw first a small tonal sketch from the photograph. By doing this, you are getting away from the photographic representation of the scene and going towards the pictorial treatment of the subject.


There are other ways to avoid having your work looking too photographic. Work from small prints (5” x 7”) where you can’t see all the details; work from a Black and White photograph or use a slightly blurry photo.


Another strategy is not to reproduce the photograph as it is. You can change the format (use a landscape format photograph to create a portrait format work). Rather than working from a single reference photograph, combine a series of photographs and use thumbnails to work-out a composite picture based on your selection of photographs.

A good technique is to hide away your reference photograph in the middle of your session, once you have established the main masses, lights and shadow areas and work for some time without your reference photograph. After this “free from photograph” period, you can start referring to it again.

Let me finish by circling back where we started: there is nothing wrong with reference photographs. Now, you know their limitations and the best way to use them while being yourself.


Monday, 19 April 2010

More on using a ruler for watercolour


In an earlier post, 10 ways to improve your watercolours with a ruler, I wrote that a ruler is useful when tracing objects like buildings in perspective. In particular, verticals remain vertical and this is also something you can trace with a ruler. Even if you don’t want to trace everything with the ruler, at least consider the main outlines.

If you have a drawing table, like James Gurney, then tracing vertical lines is not a problem. This is not a practical solution if you are travelling or away from your studio.

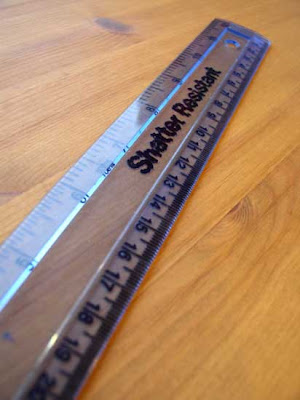
An alternative solution is to use a translucent plastic ruler, graduated on both sides with the same units (it does not really matter if it is centimetres or inches, but you cannot use a ruler that has one side in centimetres and one side in inches).


This is the way I do it:

  • I trace a frame all around the sheet of paper with at least one centimetre margin.

  • To draw a vertical line, I position the ruler perpendicular to the horizontal frame line at the top of the page. To ensure the ruler is really vertical, I check that the marks on each side of the ruler are aligned on the horizontal frame line (as shown on the photograph).


Friday, 16 April 2010

Taking down an exhibition


My current exhibition at Intel just finished and I went to take it down. I thought I would show you what happens behind the stage.


I am using IKEA bags (I have no share or commercial interest in IKEA – unfortunately). They sell them very cheaply and they are very strong. After I installed the exhibition, I folded the bubble wrap and stored it into the bags, so everything was ready when I had to take down the exhibition.


At the start


All packed - ready to go!

I leave the paintings on the wall until I pack them. This reduces the risk of breakage.

I collect all the labels first. Before filing them (see my previous article on “Storing your exhibition labels”), I will use them to double-check that I have updated my inventory in order to indicate the exhibition information for each painting.

I am wrapping all paintings individually or two by two if they have the same dimensions. In this case, I put the paintings back to back so that the D ring and screws do not damage the frame of the other painting. As the paintings are facing outward, I can find a painting in my storage area without having to unwrap them.

I am using masking tape, available from any hardware store selling household paint, to seal the bubble wrap packing. Masking tape is easy to cut (even with your fingers only) and can be removed without causing too much damage to the bubble wrap. Before, I was using the brown packing tape but you can’t get it off without tearing apart the bubble wrap. This way I can re-use the bubble wrap several times.


Painting wrapped using masking tape


Add to Technorati Favorites

Friday, 2 April 2010

How to set-up your French easel (on your own)


This will seem very basic if you've owned a French easel for a long time, but can you save you some guess work if you just acquired one.


First extend the back leg which is folded under the box of the easel.


Then comes the tricky part. I balance the box on my knee and hold one side of the box with my hand.


I unfold one the leg opposite to the side I am holding with my hand.


Standing on two legs, the easel is more stable and I don't need the support of my knee any more. I can now unfold the third leg.


I make sure the box is level and adjust the extension of the leg if necessary (if the surface is bumpy).


Now I can open the box and get ready to paint.


Monday, 25 January 2010

The power of checklists

At the week-end, I read in the Saturday Times a good review of a recent book titled “ The Checklist Manifesto: How to get things right ” by Atul Gawande.


The book contains stories on how the introduction of checklists in hospitals let to significant results. For instance, a study showed that of the five basic steps that doctors could take to help to prevent line infections, doctors skipped at least one in at least a third of cases. By using a simple checklist, ten-day line-infection rates went from 11 per cent to zero.

Another profession to use checklists is aircraft pilots. In fact, use of checklist has become common in aircraft safety procedures.

It is easy to dismiss the use of checklists because they are low tech, simple and don’t cost anything. How such a simple tool can be effective in this age of electronics and gadgets? Are these simple tools being there to help the simple minds? Yet surgeons and pilots are using them and checklists save lives everyday.

There is a quote in the Saturday Times article to which I totally subscribe: “It is discipline rather than brilliance that preserves life. Indeed, discipline leaves more room for brilliance.”

Having checklist for routine tasks in your daily artist practice free-up your mind and let you concentrate on the creative side.


Checklists for artists

I found that checklists are not only practical, but also a great way to incorporate what you learn on the way. You discover that you forgot something when you go through the checklist and add it for the next time. By tweaking your checklist, you make your processes more efficient and you spend less time on tasks away from your easel.


Examples of checklists for artists:

  • Organising an exhibition checklist

  • Installing and exhibition checklist

  • New painting checklist

  • Framing checklist

  • Plein-air painting pack checklist

  • Shipping art checklist

  • New gallery checklist

  • Contract checklist

This is just scratching the surface…

Related resources


Add to Technorati Favorites


Tuesday, 12 January 2010

Cleaning your brushes for oil painting


To make them last, you have to take good care of your brushes for oil paint. Leave the paint to dry on the brush and you can bin it. How to clean my brushes is one of the first things my father tought me and it is an integral part of my painting routine. A painting session is only finished when all brushes have been cleaned and stored properly.
If you are in a field trip, it is allright to only deep clean your brushes at the end of the day, but don’t wait until the next day.


Here is the process I am using:

  1. Wipe the brush on a rag to remove the excess paint. Make sure you wipe it by pulling the brush towards you, so you don’t run the brush contrary to the hair.
  2. Dip the head of the brush in a jar of solvent to rinse it and then run the brush on the rag to remove the diluted paint. Do not leave the brush to soak in the jar.
  3. Then use liquid soap to remove the rest of the paint. In order to do this, I put a blob of soap in the palm of my hand and drive the soap into the brush tip with circling mouvements to work the soap into bristles. I then gently squeeze the head of the brush between my index and thumb, starting from the ferrule and ending at the tip of the brush, to exude the soap. I do not pull the bristle. I rinse the brush under running water, which helps removing the soap with the “trapped” paint.
  4. I start again with fresh soap in the palm of my hand, until there is no more trace of colour in the soap exuded from the brush head. It will take several goes as the paint gets trapped inside the ferrule.
  5. At the end, use your finger to fashion the hair into its original shape while bristle is moist.
  6. I clean my hand thoroughly. Some paints contain chemicals that can be harmful. If you are concerned about the health and safety of this process, you should wear rubber gloves.
  7. I let the bristle to dry on the edge of the window sill and then store the clean brush in a jar with the bristle-end up (otherwise, it would damage the bristle).


Friday, 11 December 2009

10 ways to improve your watercolours with a ruler


This article was first published in "Frequency Magazine"– December 2009.

A ruler is a familiar object, part of every child’s school kit and a rather unglamorous piece of office supply, but do not discount this mundane tool and you will get lots of mileage out of it.

To be able to perform all of the techniques described below, you should buy a clear acrylic ruler that is sturdy enough. Some models feature a grid or vertical lines that prove useful to check alignment and draw right angles. A 300 mm ruler divided into imperial and metric will be suitable in most situations while being transportable. Avoid metal rulers that risk marking the paper in some of the uses described below.


  • Measuring: This use is obvious, so I won’t spend too long on this. If you work from photographs, taking measurements of key features will make keeping accurate proportions between the different elements in the picture a breeze.

  • Materialising the horizon: By placing the ruler on your paper to materialise the horizon, you can visualize how the composition would look. In a landscape, this will help you to decide how much sky or land you want to show.

  • Tracing objects in perspective: I would rather draw everything free hand to get a more natural feel, but there is one case where I always welcome the help of a ruler: drawing buildings in perspective. Remember that all lines which are not in the plane of the paper will converge and vanish on a point located on the horizon (could be one or two points depending on the perspective). Verticals remain vertical and this is also something you can check with a ruler.


  • Use the ruler as a mahl stick: For oil painting, a mahl stick is used to rest the hand holding the brush in order to paint details without touching the surface of the wet canvas. It is composed of a long thin pole with a rounded pad at the end. You can use your ruler in the same way by having one end of the ruler resting on the drawing board just on the side of the stretched paper while your free hand holds the ruler in position across the paper, a few centimetres above its wet surface. You then rest your hand holding the brush on this improvised mahl stick to paint with accuracy.

  • Use the ruler as a hand rest: In this case, the paper is dry and the ruler can rest flat on the paper surface. One reason you may want to do this is to avoid the grease on your hand transferring onto the paper. This is more relevant in hot weather.

  • Use the ruler as a guide to apply masking fluid: Rest one edge of the ruler on the paper, hold the ruler at a 45 degrees angle and use the other edge to guide the ferrule of the tool you apply masking fluid with. This technique is useful to reserve light ripples on calm water.

  • Paint straight lines with a ruler: This technique is based on the same principle as the previous technique but with paint rather than masking fluid. In order to get the correct position, align the side of the ruler you are going to use as a guide with the line traced on the paper, lift the ruler into position and then proceed as described before. This technique works well to paint boat masts, lampposts and telegraph poles.

  • Use the ruler as a temporary mask: Lay the ruler flat on the paper and paint over the edge. When you are done, lift the ruler carefully and wipe it clean with a paper towel. Your colour plane will have one straight edge. It is likely that some paint (in particular if highly diluted) will go under the ruler and the result will not be as clean as with masking tape. This type of accidents makes it an interesting technique.

  • Use the ruler as a stamping device: Apply paint on part of the edge of the ruler and use it as a stamp to print a straight line onto the paper. Wipe the ruler clean between applications. This is an effective way to paint dark railings.

  • Use the ruler as a squeegee: In this technique, the ruler is used in the same way the operator uses a squeegee (or rubber blade) in screen printing. Apply some colour on the paper, and then hold the ruler with both hands at a 45 degrees angle to the paper and drag the paint down using the edge of the ruler. Wipe the ruler clean with tissue paper as soon as you are done. A reverse use of this technique is to start with a graded wash and then, before it dries, to push the pigments up with the ruler. This will create a lighter area where the pigments have been removed and a darker zone where the pigments have been pushed to.

One last word: Overusing a ruler when drawing your composition may lead to a stiff and rather mechanical look, but use it with moderation or in a creative way and your watercolours will benefit greatly from this simple tool.


Add to Technorati Favorites


Friday, 4 December 2009

My exhibition kit

When I set-up an exhibition, I want to have everything I need at hand so that I don’t waste time or have to come back. The photographs below show what I take with me when I set-up or take down an exhibition.


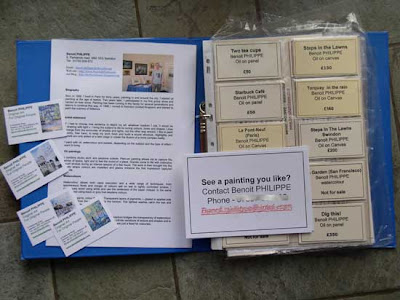
Binder with labels; signs with contact details on how to buy and business cards


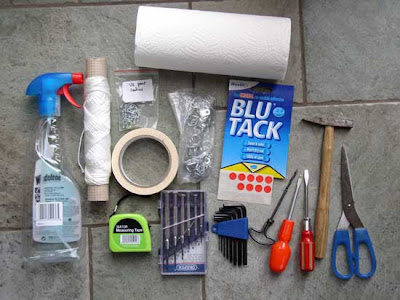
From top to bottom and left to right: paper towel, window cleaner spay, cord, screws, masking tape, framing rings, Blu Tack, measuring tape, 6 piece precision slotted screwdrivers set, Allen keys, hand drill, screw drivers, framer hammer and a pair of scissors

  • Repair kit for framed works: screws, screw drivers, hammer, string, rings and a pair of scissors.
  • Measuring Tape: To check appropriate spacing between paintings.
  • Window cleaner product and paper towels: A quick wipe to remove dust and finger prints from glass.
  • Blu Tack®: I use it to stick the labels below the paintings as well as my bio information and the signs with my contact details for people who want to purchase a painting. Another use of this product consists in sticking two balls of Blu Tack at the bottom of a frame in order to make it steady. If paintings are hung on a metal wire, it may be the only way to keep them from being ajar.
  • Precision screw drivers and Allen keys: Some hanging rods have small screws for the hook.
  • Masking tape: Now, I use masking tape to seal-off bubble wrap around my paintings. I found that it works better than packing tape as it comes off without damaging the bubble wrap (this way, I am able to reuse it over and over).

In addition to what is shown in the photographs, I also have the following items:

  • Digital camera: I always take a series of photographs of the exhibition when I finish setting it up. It serves a dual purpose: first for my record and future marketing use; then to complete my inventory and add the details of the exhibition to the comments section for each painting on display.
  • Pen and paper (or a small notebook): You never know when you need to take some notes.
  • Details for the venue: The email with the address of the exhibition venue, the name of the person in charge of the exhibition space and a telephone number to call in case of problems. If you are running late, you want to make sure you can call as a courtesy. The other time when a phone number is handy is when you don’t find the venue or the venue is closed the public and you cannot get in.
  • Some large IKEA carrying bags: You can buy them cheaply from their store. These blue bags do not look nice, but they are sturdy and ideal with their long handles to carry paintings. I also put in the bags all the pieces of bubble wrap in as I unpack the paintings in order to keep the space tidy when I set-up.

They best way to make sure you have a complete kit ready at all time is to keep everything you need in a separate bag of crate. This means you may have to buy duplicate tools and material.

If you cannot afford the cost or do not have the space to get duplicate of some of your tools, then you should put together a checklist with the content of your kit. There is always something to do at the last minute and, with the pressure to get ready, you don’t want to forget a vital piece of equipment. Having a checklist will bring you peace of mind (why do you think surgeons and pilots use checklists?)


Add to Technorati Favorites